
Field Four User Manual
Field Four 1.01 — 2026
Introduction
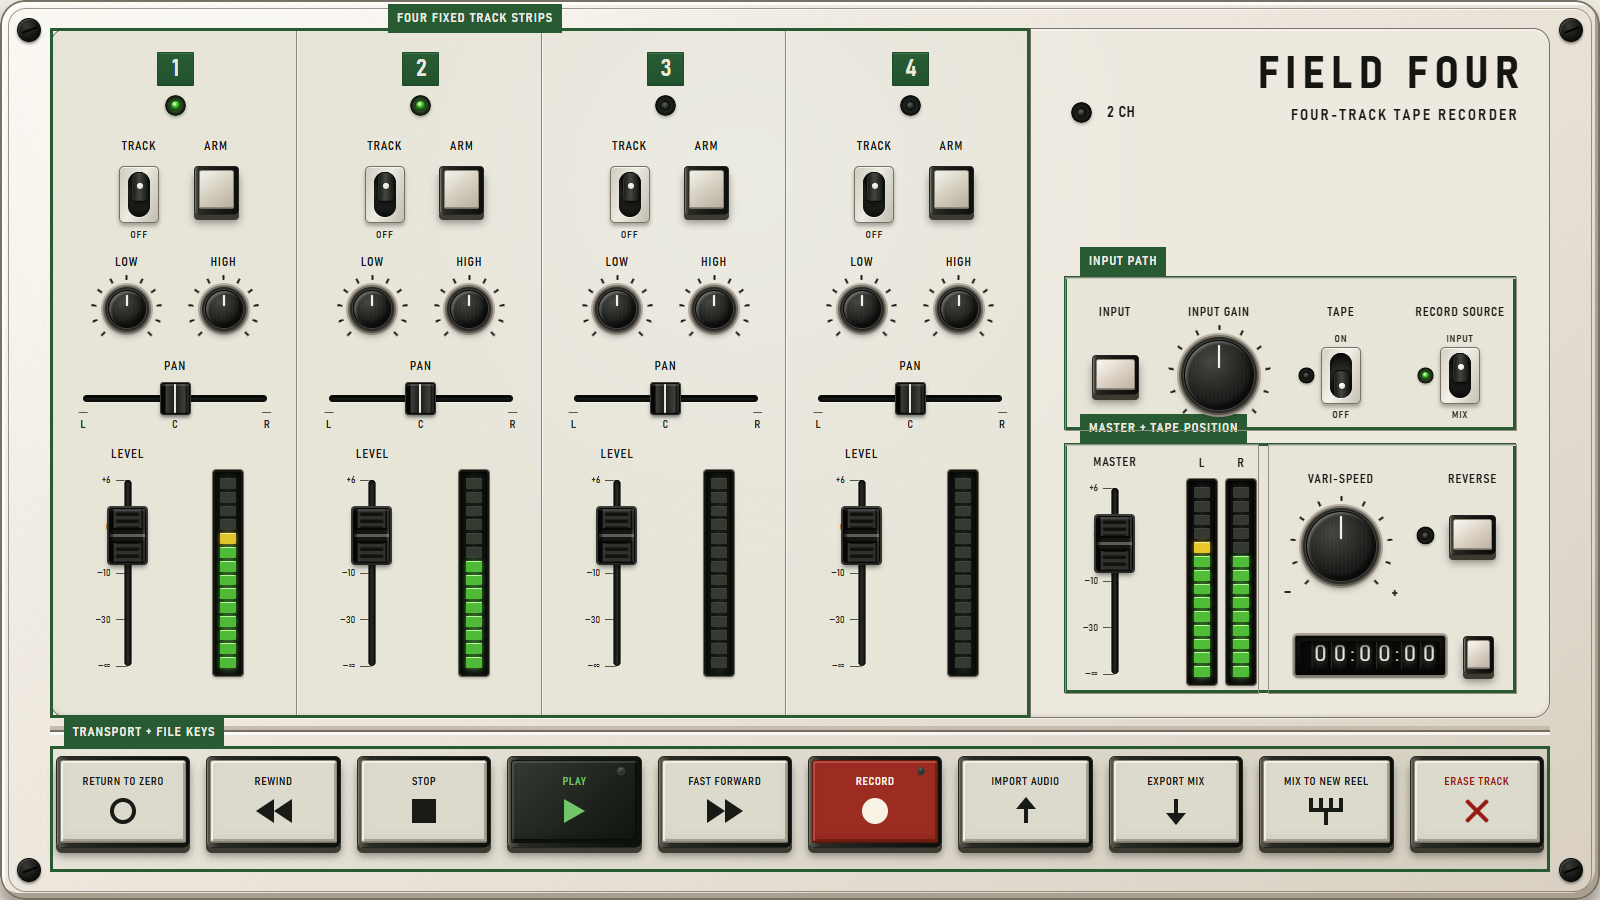
Field Four is a four-track tape recorder for Windows. It gives you four continuous mono Tracks, a live input path, a small playback mixer and the tape operations needed to turn a performance into a finished recording.
It is deliberately not a DAW. There are no hidden takes, movable clips, plugins, automation lanes or extra Tracks out of sight. You record onto the four Tracks you can see. When they are full, you erase, bounce, or mix them to a new Reel and keep going. That commitment is part of the instrument.
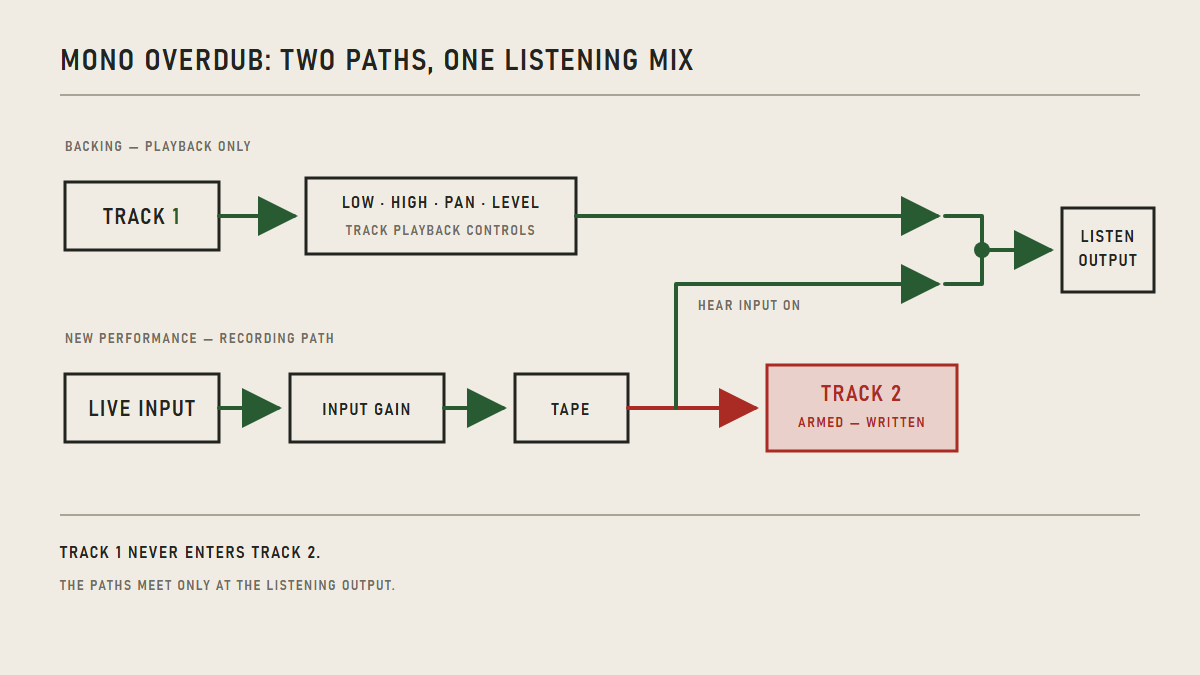
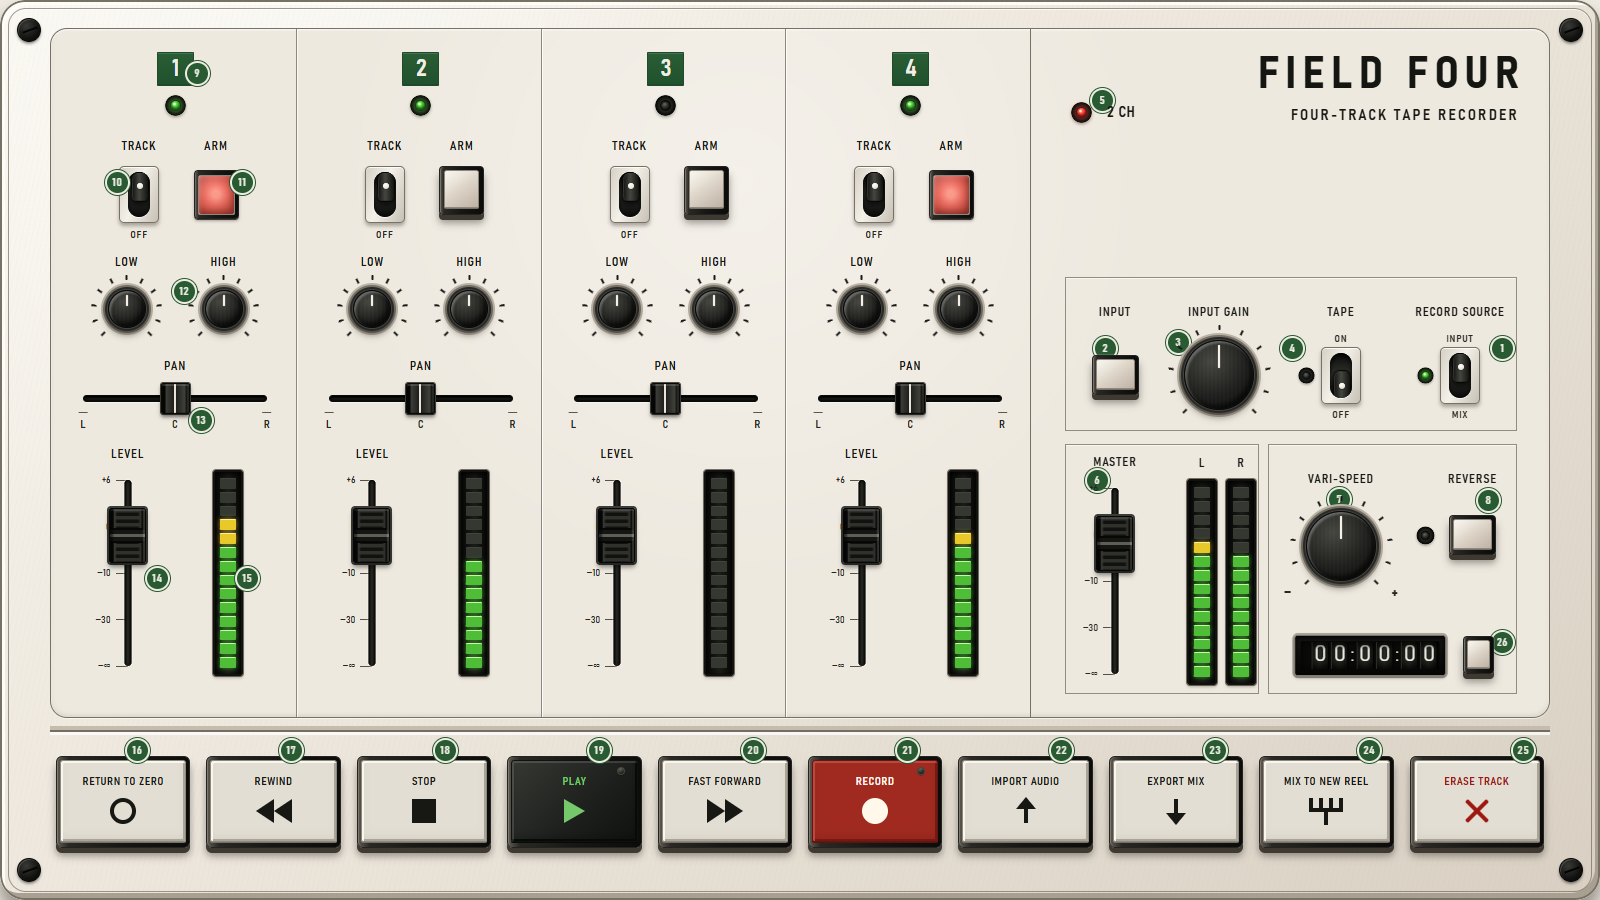
Each Track strip plays recorded material. Live sound enters through the separate INPUT path, passes through INPUT GAIN and TAPE, and is written to one or two armed Tracks. The Track LOW, HIGH, PAN and LEVEL controls shape playback and mixing; they do not change the level being recorded from the input.
Getting Ready
Open Field Four
The first time you open Field Four, it starts with an Untitled Reel containing four Empty Tracks, then opens the welcome and audio-timing workflow. Field Four measures the delay through your audio input and output so later recordings land in time with the Tracks you hear while playing.
On later launches, Field Four reopens the last named Reel, with its head position and control settings restored.
Check audio timing
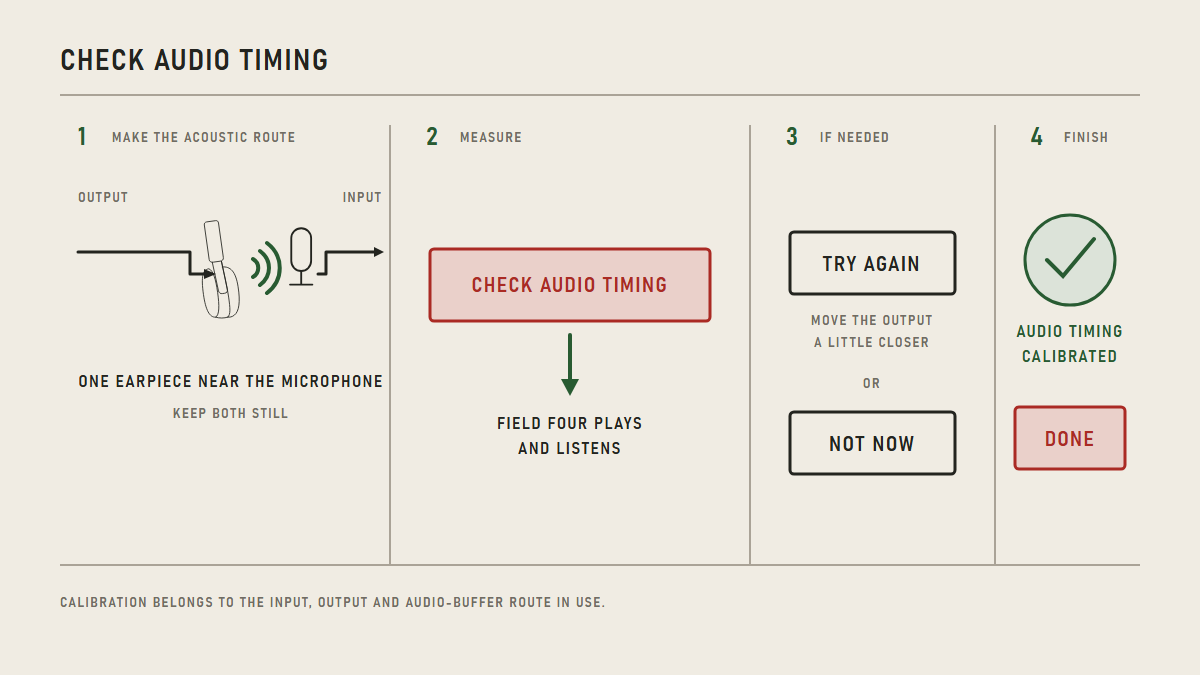
The welcome panel reads WELCOME TO FIELD FOUR and ONE QUICK CHECK BEFORE WE START.
- Put the computer output within audible range of the selected input. If you are using the computer microphone, hold one earpiece of your headphones near it.
- Choose CHECK AUDIO TIMING.
- Keep the earpiece and microphone still while Field Four plays and listens for the calibration sound.
- When the panel shows AUDIO TIMING CALIBRATED, choose DONE.
If Field Four cannot measure the route confidently, choose TRY AGAIN and move the output a little closer to the input.
You may choose NOT NOW. A first Track recorded on its own does not need timing correction, but overdubbed Tracks may be out of sync until calibration is completed.
Calibration belongs to the exact input, output and audio-buffer route in use. Field Four asks again when that route changes. COMPUTER AUDIO does not use acoustic calibration.
Recording the First Track
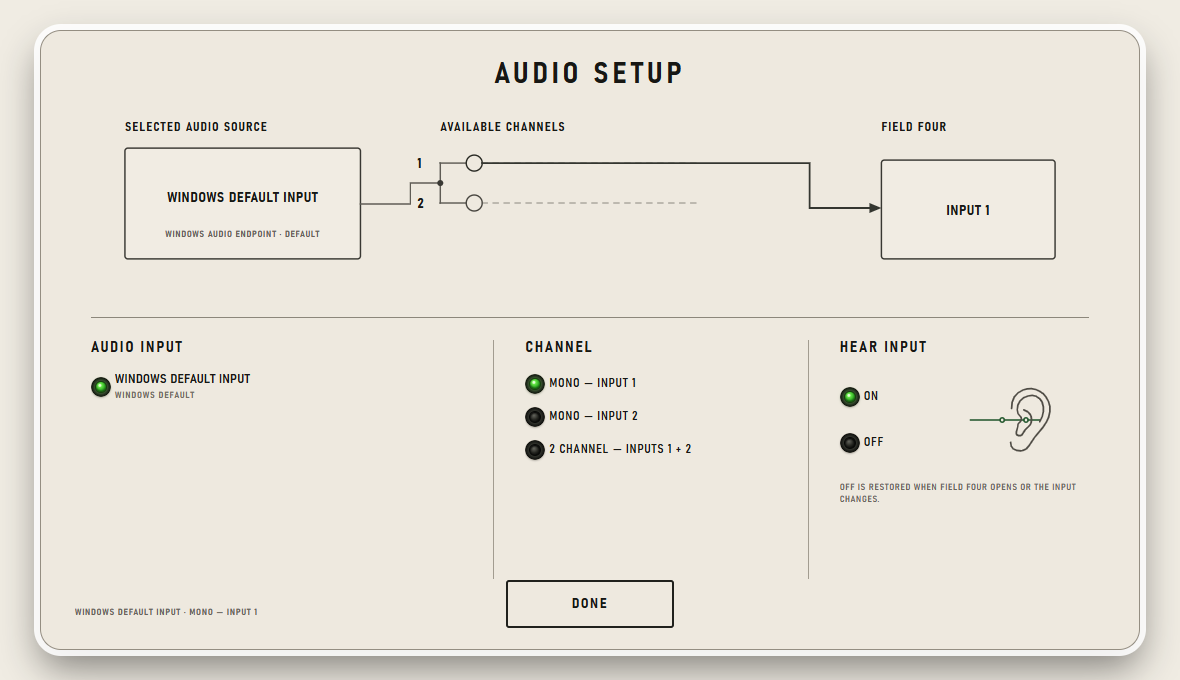
1. Select the input
Open Audio > Input Setup…
Under AUDIO INPUT, choose your microphone or audio interface.
Under CHANNEL, choose one input, usually MONO — INPUT 1 or MONO — INPUT 2 on a two-channel device.
Turn HEAR INPUT On if you want to monitor through Field Four. Use headphones when monitoring a microphone; speakers can cause feedback.
Choose DONE.
2. Prepare Track 1
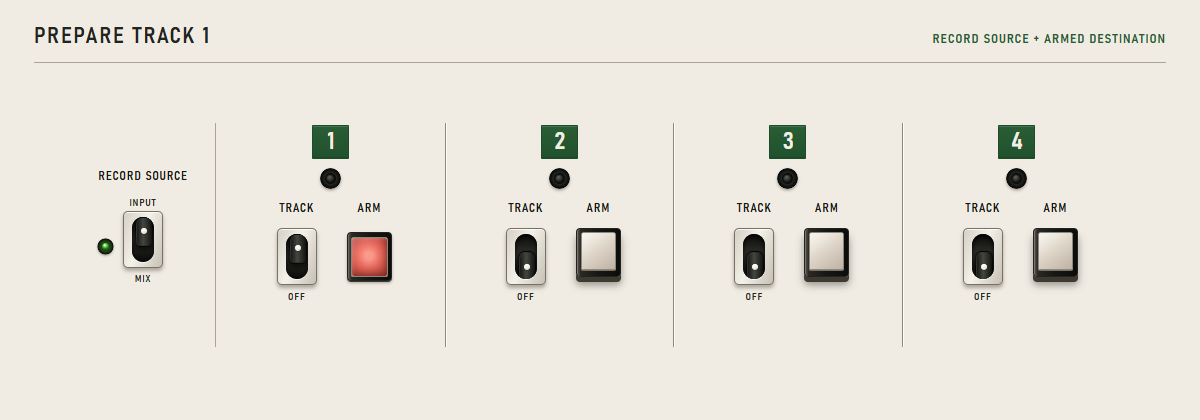
- Set RECORD SOURCE to INPUT.
- Set Track 1 to TRACK.
- Press Track 1 ARM. Leave the other Tracks unarmed.
The Track 1 meter now shows the signal that will be recorded.
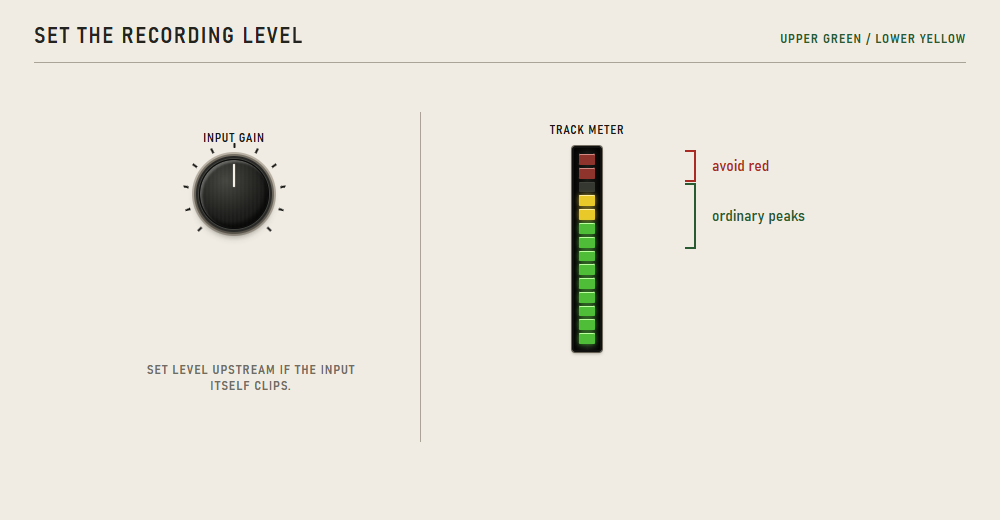
3. Set the recording level
Play or sing at the loudest level you expect to record.
Adjust INPUT GAIN so ordinary peaks reach the upper green or lower yellow part of the meter. Avoid the red.
If the meter remains red after reducing INPUT GAIN, lower the level at the microphone, instrument or audio interface.
4. Record
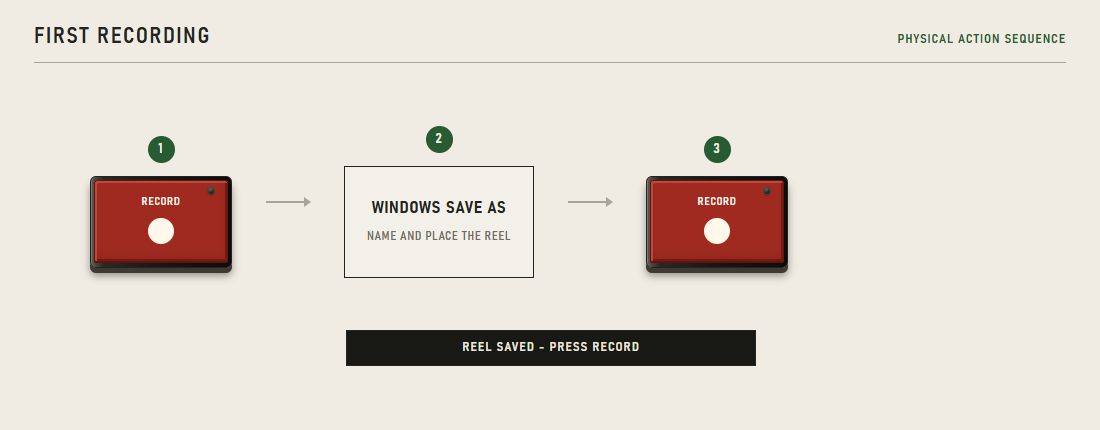
Press RETURN TO ZERO, then RECORD.
Field Four opens Save As. Choose a location and give the Reel a name.
When Save As closes and the status display shows REEL SAVED - PRESS RECORD, press RECORD again.
Perform, then press STOP.
5. Play it back
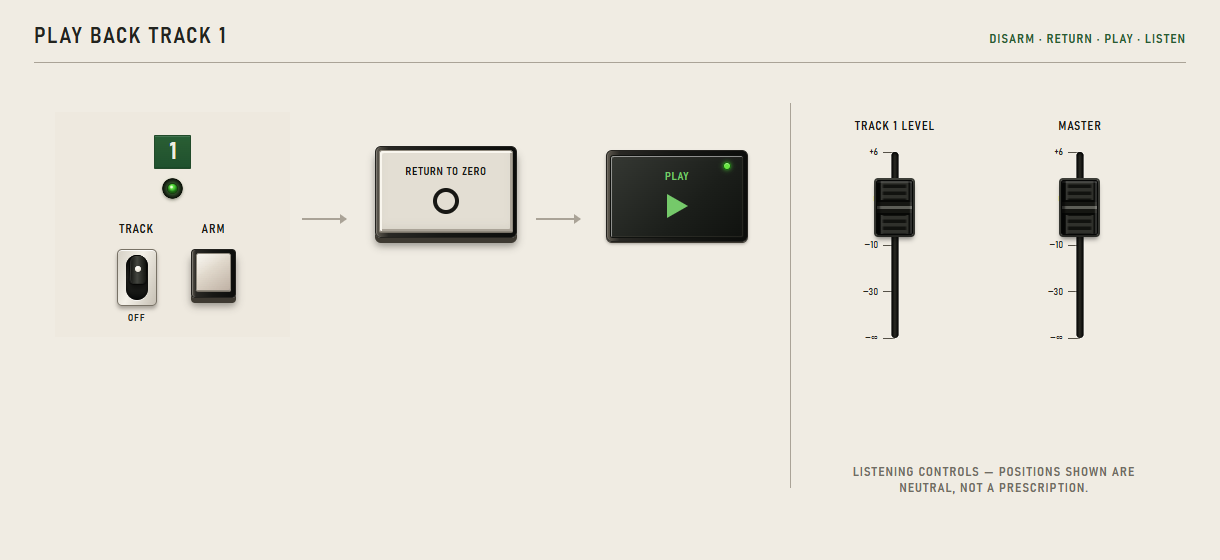
Press Track 1 ARM again to disarm it.
Press RETURN TO ZERO, then PLAY.
Use Track 1 LEVEL and MASTER to set the listening level.
Press STOP.
You are ready to record another Track.
Playing Back and Overdubbing
Play recorded Tracks
- Set each Track you want to hear to TRACK. Set an unwanted Track to OFF, or lower its LEVEL.
- Press RETURN TO ZERO, or use REWIND and FAST FORWARD to find another starting point.
- Press PLAY.
- Shape each Track with LOW, HIGH, PAN and LEVEL. Use MASTER for the overall listening level.
- Press STOP.
An unarmed Track meter shows that Track's playback level. An armed Track meter shows the incoming signal that would be written there.
Record while listening to another Track
- Leave the backing Track set to TRACK and disarmed.
- Set RECORD SOURCE to INPUT.
- Arm one empty Track for the new performance.
- Press PLAY and rehearse against the backing Track.
- Balance the backing with its LOW, HIGH, PAN and LEVEL controls.
- Set the new performance with INPUT GAIN.
- Press STOP, then return to the point where the overdub should begin.
- Press RECORD, perform, then press STOP.
Only the selected input is written to the armed Track. The backing mix remains on its original Tracks.
You can also begin with PLAY and press RECORD while the tape is moving. That is a punch-in; it is covered in Punching In and Out.
Recording in Stereo
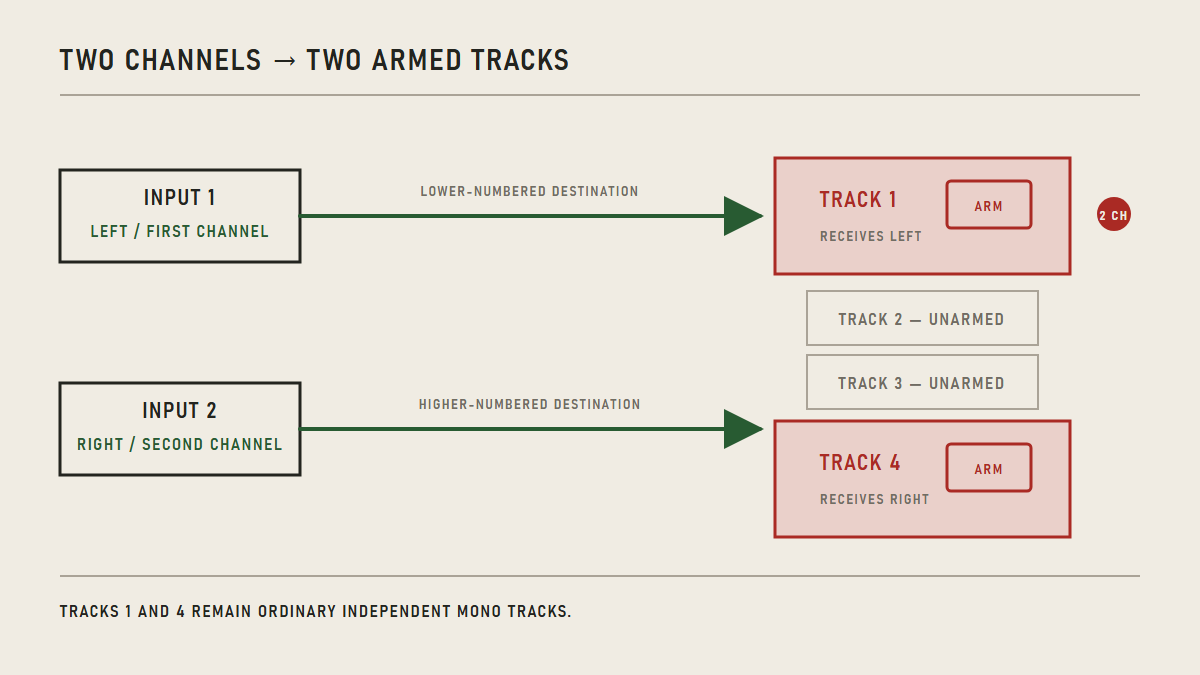
Field Four records two-channel sound onto two ordinary mono Tracks. The red 2 CH lamp means that two synchronized input channels will be written to two armed destinations; it does not permanently link the Tracks.
Choose two input channels
- Press INPUT, or open Audio > Input Setup…
- Choose the required device under AUDIO INPUT.
- Under CHANNEL, choose a two-channel pair such as 2 CHANNEL — INPUTS 1 + 2.
- Choose DONE.
Choose the destination Tracks
- Arm any two Tracks. They do not need to be adjacent.
- Check that the 2 CH lamp is lit.
- Set the level with INPUT GAIN and record normally.
The Left channel goes to the lower-numbered armed Track. The Right channel goes to the higher-numbered armed Track. For example, with Tracks 1 and 4 armed, Left (Input 1) is written to Track 1 and Right (Input 2) to Track 4.
INPUT GAIN controls both channels together. Set the balance between them at the microphone, instrument or audio interface.
If a two-channel source is sent to one armed Track, Field Four folds the two channels to mono and leaves the 2 CH lamp dark.
Punching In and Out
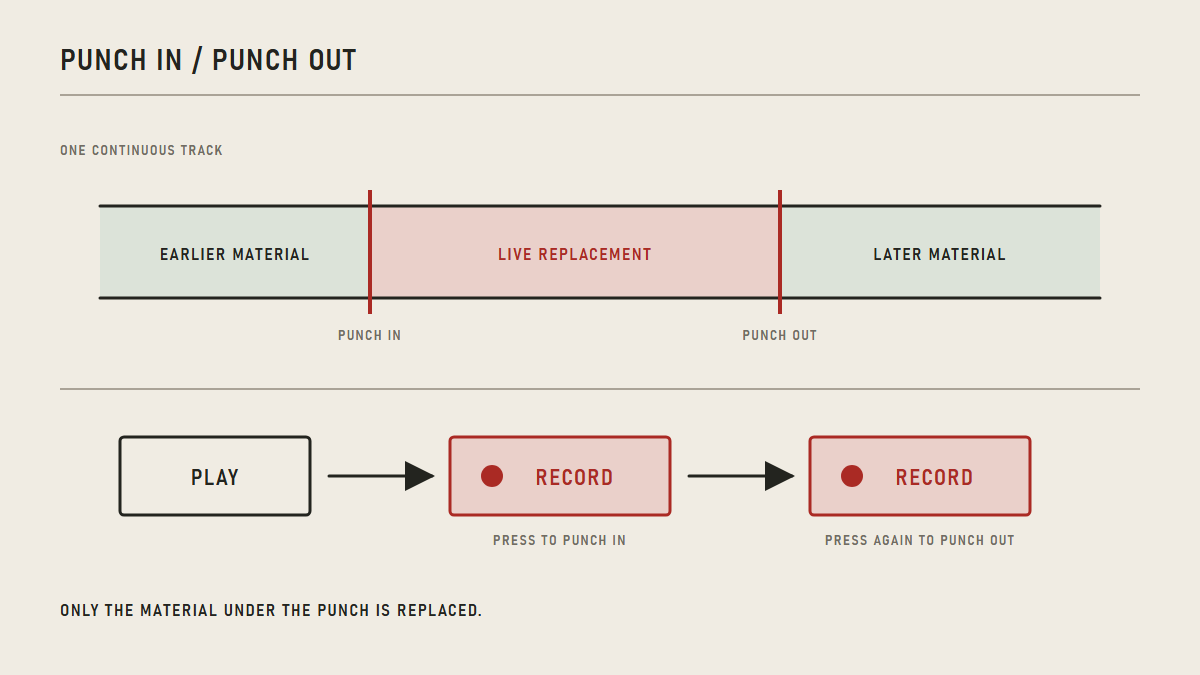
Punching replaces a chosen section of a Track while the rest of the performance survives. There are no punch markers or automatic punch points: you perform the edit with PLAY and RECORD.
Replace part of a Track
- Set RECORD SOURCE to INPUT.
- Arm the occupied Track you want to repair. For a two-channel repair, arm both destination Tracks.
- Move to a point before the repair.
- Press PLAY and play along.
- At the replacement point, press RECORD.
- Perform the replacement.
- Press RECORD again to punch out and continue listening, or press STOP to punch out and stop.
During the punch, the old material on the destination is silenced and replaced by the live input. Material before the punch, between separate punches and after the final punch remains intact.
The R key performs the same action as RECORD: it starts recording while stopped, punches in while playing, and punches out while recording.
Bouncing Tracks
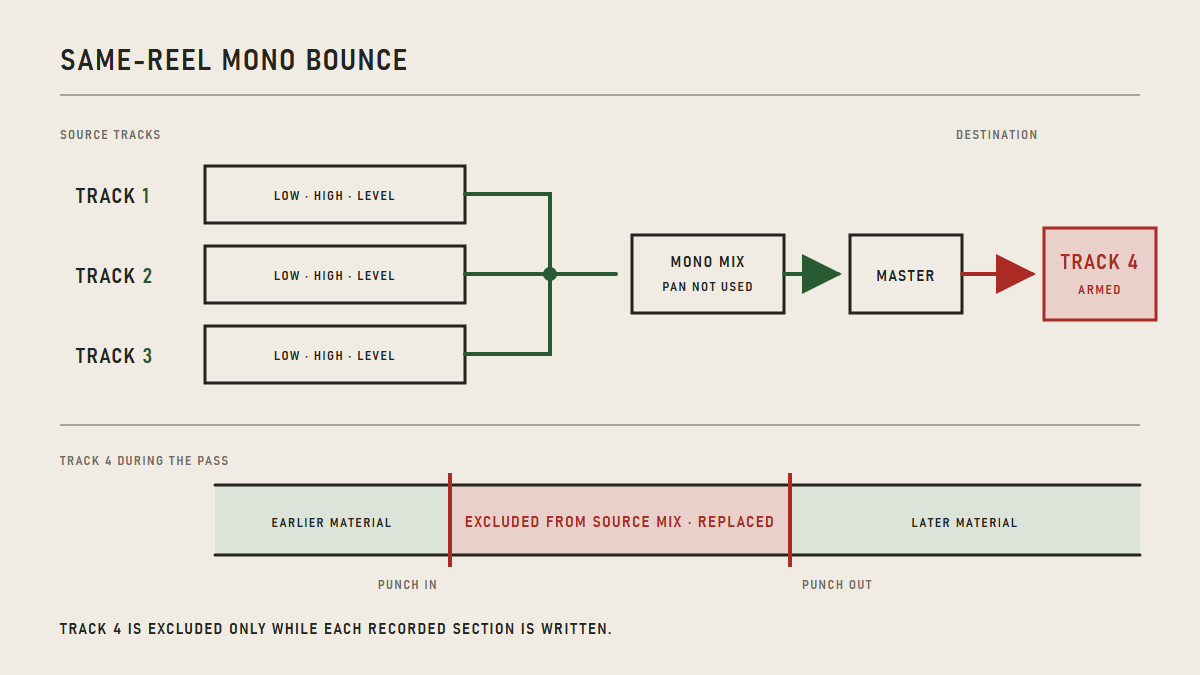
A bounce records a live mono mix of existing Tracks onto one Track of the same Reel. It is how you combine parts and free Tracks without leaving the Reel.
The bounce is performed in real time. You may change LOW, HIGH, LEVEL and MASTER during rehearsal and recording, and those changes are recorded. MASTER controls the complete bounced source mix, so you can use it for an overall level ride or fade.
Prepare the bounce
- Stop the tape.
- Set RECORD SOURCE to MIX.
- Set each source Track to TRACK or OFF.
- Balance the source Tracks with LOW, HIGH and LEVEL. Use MASTER for the overall bounce level. PAN is not used because a bounce is mono.
- Arm exactly one destination Track.
- Set REVERSE to Forward and centre VARI-SPEED.
The destination may be Empty or Occupied. An occupied destination is heard during the run-up, excluded from its own source mix while the bounce is being written, then heard again after punch-out. Only the sections you record over are replaced.
Rehearse and record
- Move to a point before the bounce should begin.
- Press PLAY. Field Four prepares the mono bounce without writing.
- At the starting point, press RECORD to punch the mix into the destination.
- Move LOW, HIGH, LEVEL and MASTER as required during the pass.
- Press RECORD again to punch out and continue, or press STOP.
- You may record several separate sections before pressing STOP. STOP commits the complete bounce to the Reel.
Bounce cannot include live input and cannot record in stereo.
Mixing to a New Reel
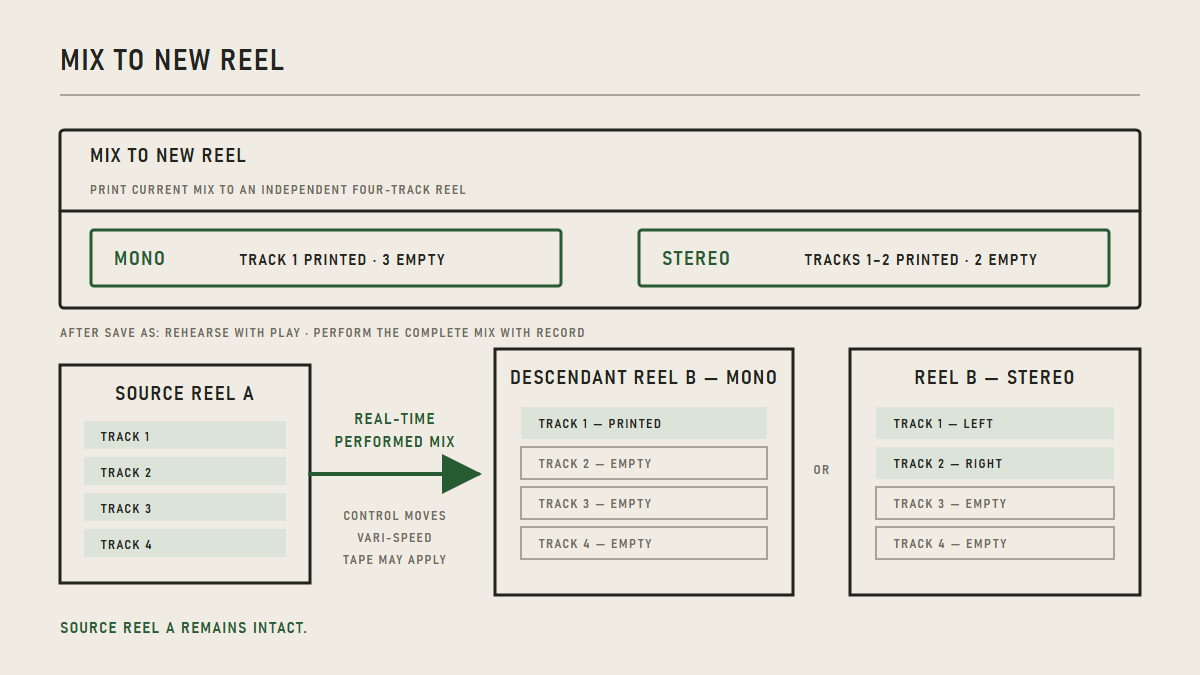
MIX TO NEW REEL performs the current Reel into a fresh four-track Reel. Use it when you want to commit a balance but continue recording, or when you want a stereo pair and two empty Tracks for the next stage.
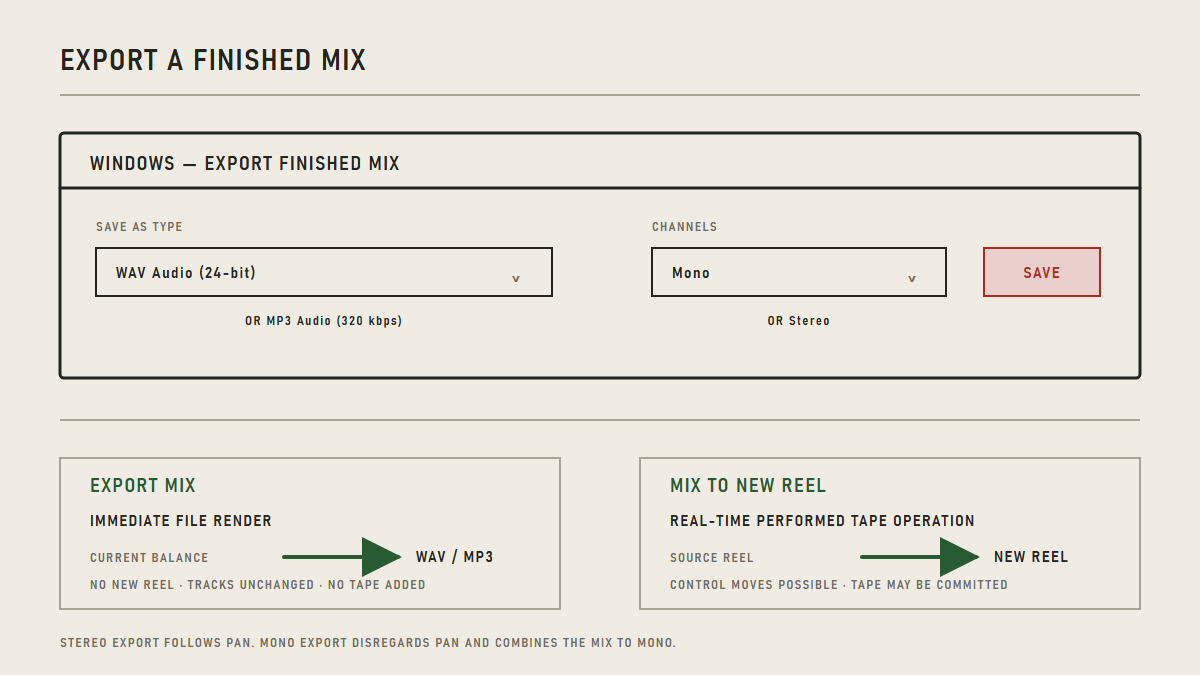
Unlike EXPORT MIX, this is a real-time tape operation. You can rehearse it, perform control moves and include TAPE in the new Reel.
Choose the new Reel
- Set the source Tracks to TRACK or OFF and prepare their LOW, HIGH, PAN and LEVEL controls.
- Set MASTER for the level recorded to the new Reel.
- Choose TAPE On or Off and select Forward or REVERSE while stopped.
- Press MIX TO NEW REEL.
- In the MIX TO NEW REEL panel, choose:
- MONO — TRACK 1 PRINTED - 3 EMPTY
- STEREO — TRACKS 1-2 PRINTED - 2 EMPTY
- In Save As, choose a location and name for the descendant Reel.
Field Four preserves the source Reel, returns it to zero and shows MONO MIX READY - PLAY TO REHEARSE - RECORD TO MIX or the stereo equivalent.
Rehearse and make the mix
- Press PLAY to rehearse without writing.
- Adjust TRACK/OFF, LOW, HIGH, PAN, LEVEL, MASTER and VARI-SPEED as the mix moves.
- Press STOP when the rehearsal is finished.
- Press RECORD to begin the complete mix pass.
- Perform any mixer and VARI-SPEED moves again.
- Press STOP at the end.
Field Four installs and opens the new Reel at zero. A mono mix occupies Track 1. A stereo mix occupies Tracks 1 and 2 as independent left and right mono files. The remaining Tracks are Empty.
The source Reel remains intact. Its final control positions are saved, while the new Reel opens Forward with VARI-SPEED centred. Any Tape, Reverse or Vari-speed effect you heard during the mix is committed to its audio.
Exporting a Mix
EXPORT MIX makes a finished listening file. It does not create a new Reel and does not alter the Tracks.
Export the current balance
- Set each Track to TRACK or OFF.
- Prepare LOW, HIGH, PAN, LEVEL and MASTER.
- Press EXPORT MIX.
- In the Windows dialog Export Finished Mix, choose:
- WAV Audio (24-bit) or MP3 Audio (320 kbps)
- Channels: Mono or Channels: Stereo
- Choose the filename and location, then save.
Field Four renders the mix immediately from user zero to the end of the last included Track. Stereo export follows PAN. Mono export disregards PAN and combines the mix to mono.
Export follows the current REVERSE direction and VARI-SPEED setting. It does not add TAPE, normalise the level or apply a limiter. If the mix exceeds the delivery range, Field Four reports EXPORT CLIPPED; lower the relevant Track levels or MASTER and export again.
Use WAV for mastering, archiving or later conversion. MP3 is the convenient finished copy.
Importing Audio
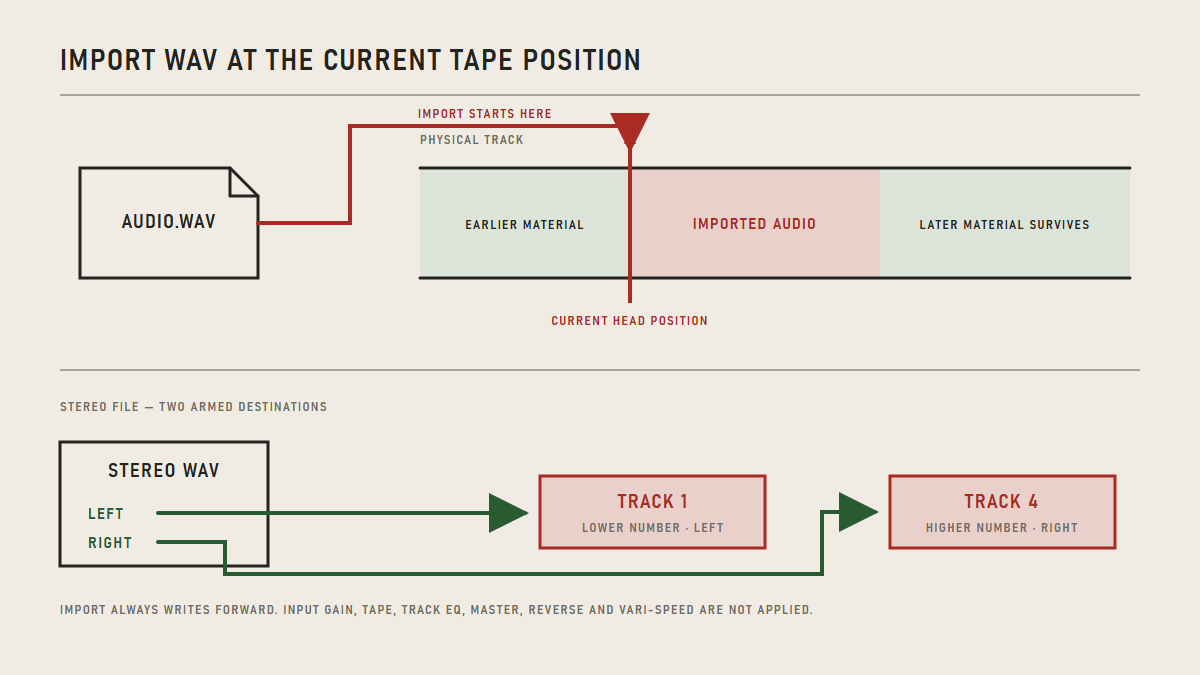
Import writes a WAV file onto the Reel at the current tape position. The result becomes ordinary Track material, not a movable clip.
Place a WAV on the Reel
- Move the head to the point where the imported sound should begin.
- Arm one Track for mono, or two Tracks for stereo.
- Press IMPORT AUDIO.
- If the Reel is Untitled, complete Save As, then press IMPORT AUDIO again.
- In Import WAV Audio, choose an uncompressed mono or stereo
.wavfile.
Field Four reads the file itself to determine whether it is mono or stereo.
- A mono WAV requires one armed Track.
- A stereo WAV with one armed Track is folded to mono.
- A stereo WAV with two armed Tracks sends Left to the lower-numbered Track and Right to the higher-numbered Track.
If the import overlaps recorded material, the key changes to CONFIRM and the status reads IMPORT WILL OVERWRITE RECORDED MATERIAL. Press CONFIRM to write it, or press Escape to cancel.
Only the part of the Track covered by the imported audio is replaced. Existing material after it survives. Import does not apply INPUT GAIN, TAPE, Track EQ, MASTER or normalisation, and it always writes forward from the physical tape position regardless of REVERSE or VARI-SPEED.
Field Four accepts uncompressed mono or stereo WAV in 8-, 16-, 24- or 32-bit integer PCM, or 32-bit float. Other sample rates are converted to the Reel's 48 kHz Track format.
Using Tape, Vari-speed and Reverse
Record with Tape
TAPE gives a recording one restrained pass through Field Four's fixed tape process. It adds a subtle analogue warmth, like vintage tube equipment or a recording passed through several tape generations. The effect of one generation is slight, but repeated Bounces and mixes to new Reels build it into a warm, pleasant saturation.
Technically, Tape combines saturation, peak rounding and high-frequency softening. It has no amount, model or quality setting, and it does not add hiss, wow, flutter or a hidden limiter.
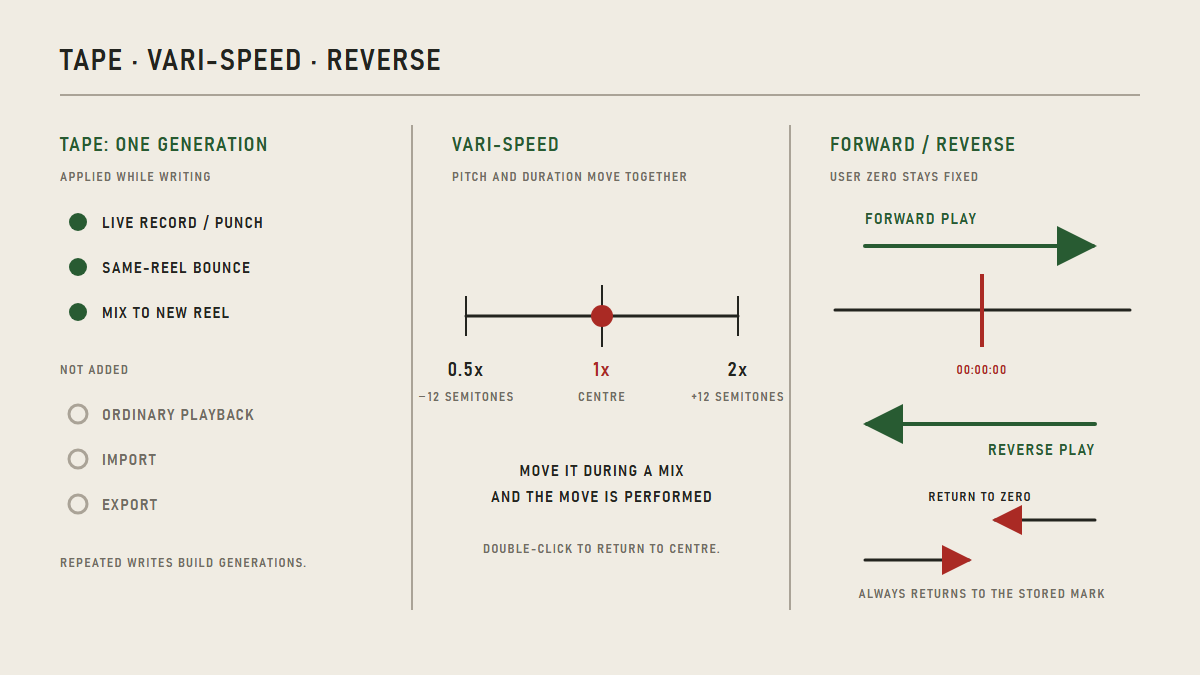
Set TAPE to ON before a recording or mix that should include this character. Each operation with Tape On adds one generation to the recorded sound.
Tape is applied during:
- live recording and punch-in;
- real-time Bounce; and
- Mix to New Reel.
Tape is not added during ordinary playback, Import or Export. If the incoming signal clips before Tape, Tape cannot repair it; reduce the upstream level.
Change tape speed
VARI-SPEED changes pitch and duration together, like changing the speed of a tape machine.
- Full left: 0.5x speed, one octave down.
- Centre: 1x speed, original pitch and duration.
- Full right: 2x speed, one octave up.
Double-click the control to return it to centre.
You may move VARI-SPEED during playback, recording or Mix to New Reel. The movement is performed into the result. A recording made away from centre can take longer to become playable after STOP while Field Four places it onto the Reel.
For a classic tape-speed effect, record a part at one speed and play it back at another. Record a line at 2x and return to centre to hear it an octave lower; record at 0.5x and return to centre to hear it an octave higher.
Run the tape in Reverse
Stop the tape, then press REVERSE. The lamp reports that the tape direction is reversed. Press it again while stopped to return to Forward.
In Reverse, PLAY and the counter move toward earlier physical tape positions. Recording writes in that direction. When you return to Forward, the newly recorded performance plays backwards.
REWIND and FAST FORWARD keep their mechanical meaning relative to the tape direction, so their movement across physical tape coordinates swaps in Reverse. RETURN TO ZERO always returns to the stored zero point.
Reverse affects playback, recording, punch-in, Export and Mix to New Reel. Import, Erase, Save, Open and timing calibration do not reinterpret the media.
Working with Reels and Files
Save and open Reels
Use the File menu for Reel operations:
- New Reel opens a fresh Untitled Reel.
- Open Reel… opens an existing
.f4rReel. - Open Recent lists up to ten recently used Reel paths.
- Save checkpoints the current named Reel.
- Save As… creates an independent copy and switches to it.
An Untitled Reel lives in memory until it is named. Recording or importing first asks for a name and location. Save the Reel before erasing a Track.
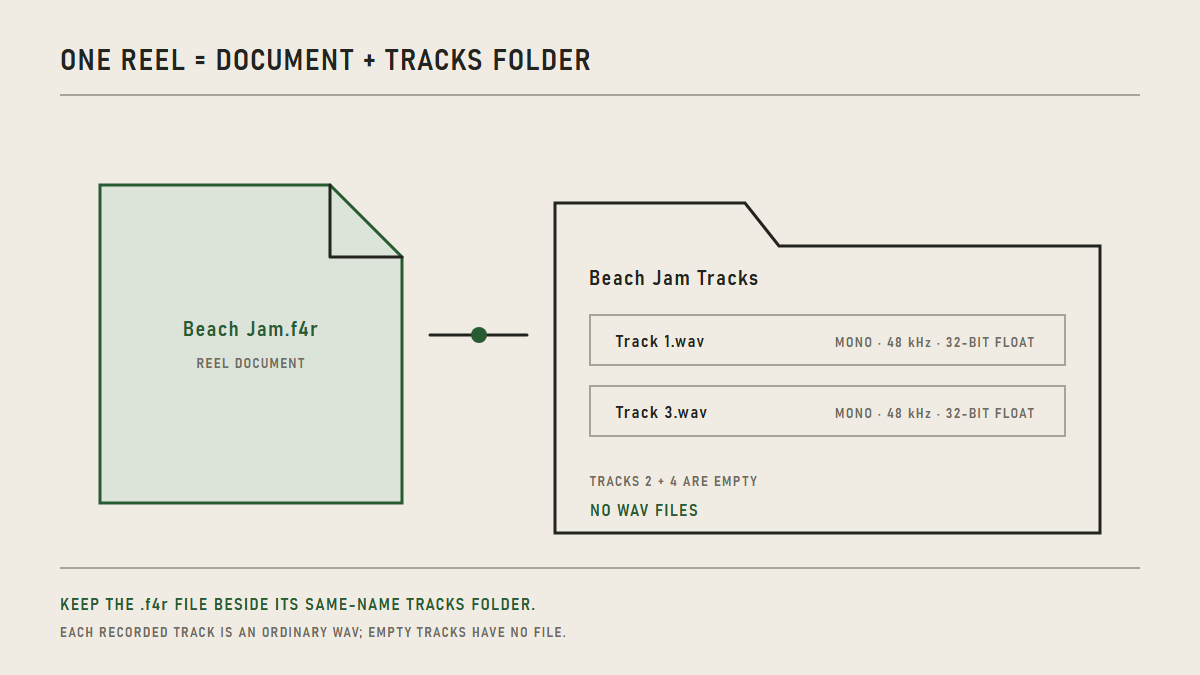
A saved Reel consists of a small .f4r document and a same-name Tracks folder. The folder contains one WAV for each recorded Track; Empty Tracks have no file. For a Reel with material on Tracks 1 and 3:
Beach Jam.f4r
Beach Jam Tracks\
    Track 1.wav
    Track 3.wav
The .f4r document and Tracks folder belong together. The Track files are ordinary WAVs, so you may process or replace them in another audio program if you preserve the original filename, exact length and format: mono, 48 kHz, 32-bit floating point. Close Field Four first and keep a backup. If a referenced recorded Track is missing, has changed length or is in another format, Field Four refuses to open the Reel rather than quietly substituting silence.
Name a Track
- Click the green Track number/name area.
- Type a name of up to 18 characters.
- Press
Enteror click away to keep it. PressEscapeto cancel.
The name is stored in the Reel; it does not rename Track N.wav.
Set your own zero point
The small unlabelled key beside the counter is Set counter zero.
- Move the head to the point you want to treat as
00:00:00. - Press the blank key.
The counter changes around that point, but the head and audio do not move. RETURN TO ZERO now returns to the stored point. REWIND may pass it and show negative time.
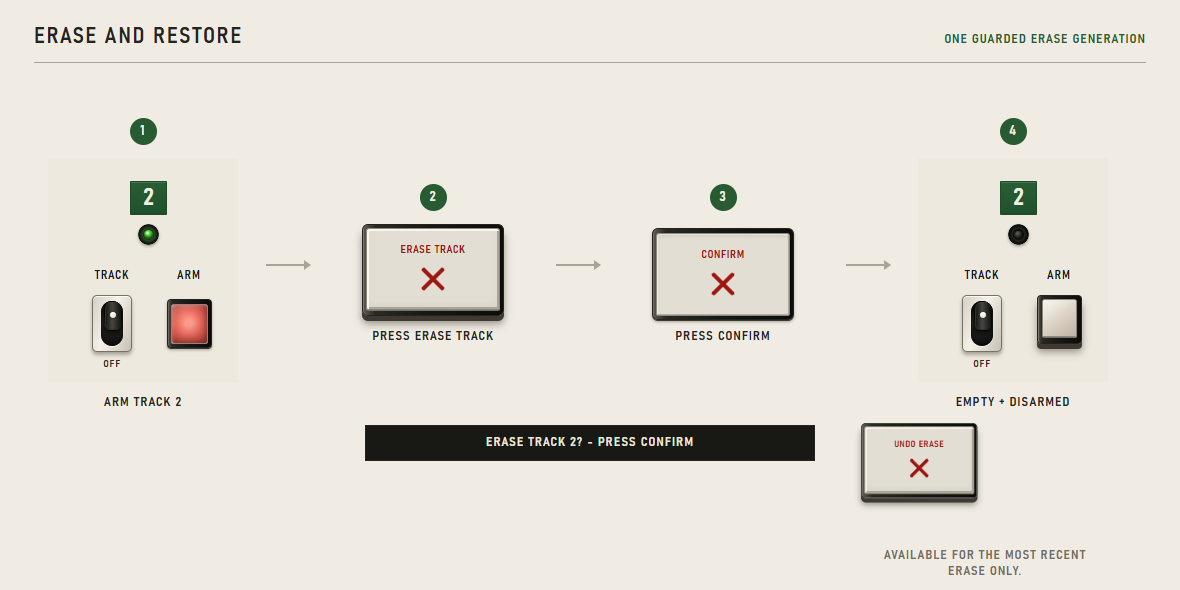
Erase and restore a Track
- Stop the tape and arm the Track or Tracks to erase.
- Press ERASE TRACK.
- Check the status, such as
ERASE TRACK 2? - PRESS CONFIRM. - Press the same key, now labelled CONFIRM.
The erased Tracks become Empty and disarm. Their mixer settings remain where they were.
After an erase, the key becomes UNDO ERASE when no Track is armed. Press it to restore the most recent erased generation. Only one erase generation is retained; a later erase, successful write or change of Reel expires the previous undo.
Audio Input Setup and Timing Calibration
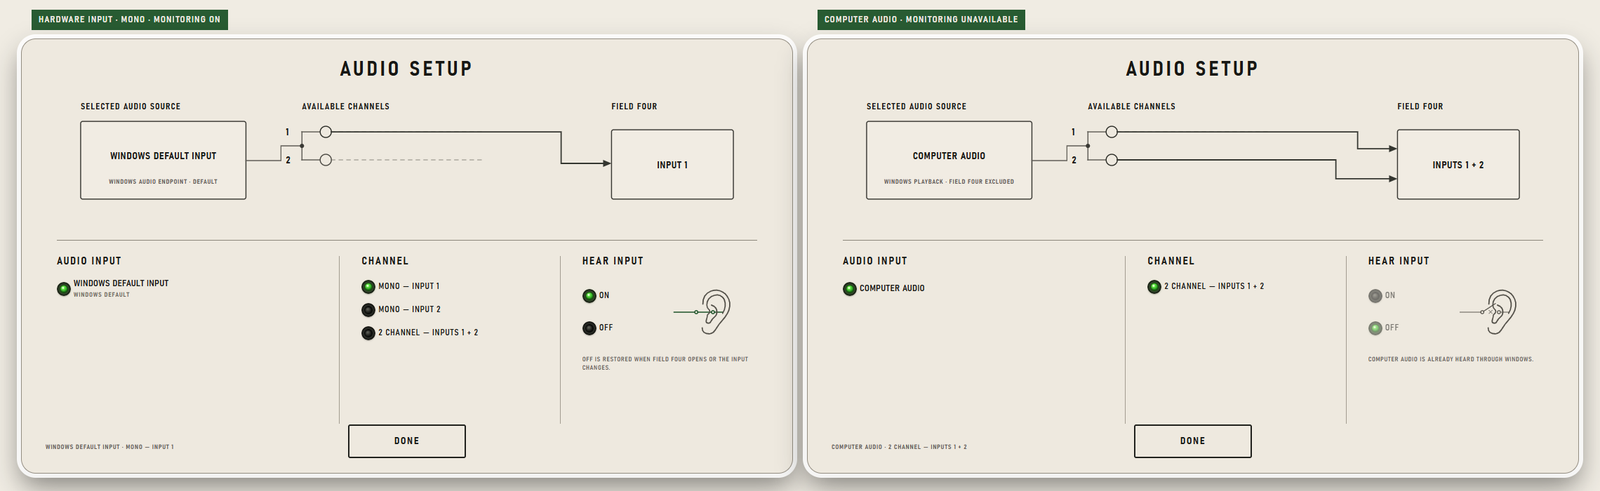
Choose a hardware input
Press INPUT on Field Four, or open Audio > Input Setup…
The AUDIO SETUP panel contains:
- AUDIO INPUT — the Windows capture device;
- CHANNEL — one mono input or one adjacent two-channel pair;
- HEAR INPUT — monitoring through Field Four; and
- DONE — close the panel.
Field Four remembers the selected endpoint and channel globally. If a saved device is temporarily unavailable, it falls back to the Windows default without forgetting the saved choice.
HEAR INPUT begins Off at each launch and after an input-route change.
Use headphones when HEAR INPUT is On for a microphone. Monitoring a live microphone through speakers can produce loud feedback.
Field Four uses one Windows audio endpoint at a time. It does not combine independent USB devices.
Record Computer Audio
Under AUDIO INPUT, choose COMPUTER AUDIO to capture the whole Windows playback mix while excluding Field Four's own sound.
Computer Audio is always two-channel. Arm one Track to fold it to mono, or two Tracks to preserve Left and Right. HEAR INPUT is disabled because the source is already heard through Windows, and acoustic timing calibration is not used.
There is no per-application picker. Silence or mute unrelated applications before recording if they should not appear on the Track.
Calibrate after a route change
Open Audio > Calibrate Audio Timing… to run the guided timing check again.
Calibration stops playback and turns HEAR INPUT Off while it measures the physical output-to-input route. Put the output within audible range of the input, choose CALIBRATE (or RECALIBRATE when offered), and keep the route still until the result appears.
Use TRY AGAIN if Field Four cannot measure confidently. Do not rely on overdub alignment until the panel reports AUDIO TIMING CALIBRATED.
The current setup panel uses the active Windows output for this measurement. It does not contain a separate Monitoring Output selector.
Controls and Menu Reference
Global recording controls
| Control | Function |
|---|---|
| RECORD SOURCE: INPUT / MIX | Chooses live input recording or same-Reel mono Bounce. Change it only while stopped. |
| INPUT | Opens AUDIO SETUP. |
| INPUT GAIN | Sets the level written from the live input. The centre mark is unity. |
| TAPE: ON / OFF | Adds Field Four's fixed Tape character during supported recording and mixing operations. |
| 2 CH | During live input, lights when two selected input channels will be written to two armed Tracks. During Mix to New Reel, lights when the new Reel will receive a stereo pair. |
| MASTER | Sets the overall playback, Bounce, mix and export level. |
| VARI-SPEED | Changes tape speed continuously from 0.5x to 2x. Double-click to centre. |
| REVERSE | Reverses tape direction while stopped. |
Track controls
| Control | Function |
|---|---|
| Track number/name | Identifies the Track; click to edit its name. |
| TRACK / OFF | Includes or excludes recorded Track playback. |
| ARM | Chooses a recording, import, bounce or erase destination. |
| LOW / HIGH | Broad playback tone controls, approximately +/-10 dB. |
| PAN | Places the Track in a stereo mix. |
| LEVEL | Sets Track playback and mix level. The 0 mark is unity. |
| Meter | Shows playback when unarmed and the intended recorded signal when armed. |
The meters use fourteen cumulative segments. Green covers low and ordinary levels, yellow begins at -9 dBFS, and red marks the final two segments near clipping. The top overload indication holds briefly so a missed peak remains visible.
Transport and file shelf
| Key | Function |
|---|---|
| RETURN TO ZERO | Stops and returns to the stored user-zero point. |
| REWIND | Shuttles backwards relative to the current tape direction. Press again to stop shuttling. |
| STOP | Stops or finalises the current operation. |
| PLAY | Plays; in Input or Mix mode it also prepares a rolling punch-capable transport. |
| FAST FORWARD | Shuttles forwards relative to the current tape direction. Press again to stop shuttling. |
| RECORD | Records while stopped, or punches in/out while the tape is moving. |
| IMPORT AUDIO | Writes a WAV at the current physical tape coordinate. |
| EXPORT MIX | Renders the current balance to WAV or MP3. |
| MIX TO NEW REEL | Prepares a performed mono or stereo mix into a descendant Reel. |
| ERASE TRACK | Erases the armed Tracks after confirmation; offers one-generation undo. |
The small blank key beside the counter sets the current position as user zero.
Menus
File
| Item | Shortcut or purpose |
|---|---|
| New Reel | Ctrl+N |
| Open Reel… | Ctrl+O |
| Open Recent | Recent named Reels |
| Save | Ctrl+S |
| Save As… | Ctrl+Shift+S |
| Exit | Alt+F4 |
Audio
| Item | Purpose |
|---|---|
| Input Setup… | Opens AUDIO SETUP |
| Mechanical Sounds | Turns Field Four's mechanical sounds on or off; these sounds never enter a recording. |
| Calibrate Audio Timing… | Repeats the timing measurement. |
Keyboard shortcuts are Space for Play/Stop, R for Record or punch, 0 for Return to Zero, and Escape to cancel a temporary confirmation. They yield while you are typing a Track name or using a Windows dialog.
Troubleshooting and Limits
Field Four normally states what prevents the next tape operation in the status display. Correct the condition and try the action again.
Recording does not start
ARM A DESTINATION— arm the Track that should receive the recording.MONO INPUT - ARM ONE TRACK— disarm the second destination or choose a two-channel source.TWO ARMED TRACKS REQUIRE A TWO-CHANNEL INPUT— choose a two-channel input pair or record to one Track.TWO DESTINATIONS MAXIMUM— no more than two Tracks can receive live input.AUDIO INPUT UNAVAILABLE - RECORDING NOT STARTED— reconnect or reselect the input in AUDIO SETUP.RECORD FOR AT LEAST A QUARTER SECOND— make a take longer than a quarter second.
If an input disappears during recording or its stream fails, Field Four discards the uncertain take and preserves the previous Track.
The overdub is late or early
Open Audio > Calibrate Audio Timing… and repeat the measurement with the same physical input and output route you will use to overdub. Calibration is not needed for COMPUTER AUDIO.
Timing has been physically accepted on the development computer's built-in route and one clean 48 kHz Zoom H4n Pro route. Other Windows devices and buffer routes are less thoroughly proven; recalibrate after changing them.
A control will not change
STOP BEFORE CHANGING SOURCE— stop before switching RECORD SOURCE.STOP BEFORE CHANGING INPUT— stop before opening or changing the audio route.STOP TAPE TO REVERSE— stop before changing direction.- Tape direction and TAPE are locked during an active Mix to New Reel pass.
Bounce will not begin
MIX NEEDS ONE ARMED TRACK— arm exactly one destination.NO ENABLED SOURCE MATERIAL TO BOUNCE— set at least one non-destination Track containing audio to TRACK.FORWARD TAPE REQUIRED FOR BOUNCE— turn REVERSE off.CENTRE VARI-SPEED TO BOUNCE— double-click VARI-SPEED to centre it.
Same-Reel Bounce is mono and cannot include live input.
Import will not begin
MONO FILE NEEDS ONE ARMED TRACK— leave one destination armed for a mono WAV.IMPORT WILL OVERWRITE RECORDED MATERIAL— press CONFIRM only if the overlap is intended.IMPORT EXTENDS PAST REEL END— choose an earlier tape position or a shorter file.AUDIO COULD NOT BE IMPORTED - REEL UNCHANGED— use a supported uncompressed WAV and try again.
A write or mix is discarded
NOT ENOUGH FREE SPACE - TAKE NOT SAVED— free space on the Reel's drive and record again.BOUNCE BUFFER UNDERRUN - TRACK DISCARDED— the computer could not sustain a trustworthy real-time bounce; close other heavy work and retry.MIX PLAYBACK UNDERRUN - MIX DISCARDED— the performed mix could not be written reliably; reduce system load and retry.REEL COULD NOT BE SAVED - LAST GOOD VERSION PRESERVED— resolve the drive or file-access problem. Field Four has kept the last complete Reel generation.NEW REEL COULD NOT BE CREATED - SOURCE PRESERVED— choose a writable location with enough free space and try again.
Field Four warns when free space falls below roughly 5 GB and protects a 2 GiB reserve. It does not preallocate the full Reel.
Export sounds distorted
EXPORT CLIPPED means the finished mix exceeded the file's delivery range. Lower MASTER or the loud Tracks and export again. Export has no limiter, normalisation or automatic gain correction.
Reel does not open
Keep the .f4r file beside its matching Tracks folder. If you process a Track WAV externally, preserve its filename, exact length and mono 48 kHz, 32-bit floating-point format. Field Four refuses a Reel with missing or incompatible media rather than guessing what should be silent.
Current limits
- Windows application; currently proven most fully on Windows 11.
- Four continuous mono Tracks and at most two simultaneous input channels.
- One selected hardware endpoint or whole-computer source at a time; no aggregation of independent USB devices.
- Maximum physical Reel coordinate: two hours.
- No waveform or clip editing, take lanes, plugins, MIDI, automation, cloud service or internal instrument Tracks.
- Hardware operation at 48 kHz is the best-proven route. A 44.1 kHz fallback exists but is not yet a broad compatibility guarantee.
- Non-centred performed Vari-speed recordings may take noticeably longer to finalise.
Specifications
| Item | Specification |
|---|---|
| Platform | Windows; current physical acceptance centred on Windows 11 |
| Instrument panel | Fixed 1600 x 900 composition, uniformly scaled |
| Reel | Four continuous mono Tracks; maximum physical coordinate two hours |
| Simultaneous recording | One mono destination or two synchronized channels to two mono destinations |
| Canonical Track media | Mono 48 kHz, 32-bit float WAV |
| Import | Uncompressed mono/stereo WAV; 8/16/24/32-bit integer PCM or 32-bit float; converted to canonical Track format |
| Export | 24-bit PCM WAV or fixed 320 kbps MP3; Mono or Stereo |
| Vari-speed | -12 to +12 semitones; 0.5x to 2x speed; pitch and duration coupled |
| Tape | One fixed Tape effect; no amount, model, noise or quality controls |
| Input Gain | Range 0-10; centre position 5 is unity |
| Track Low/High | Broad shelving controls, approximately +/-10 dB |
| Track and Master Level | Silence at bottom; unity at the 0 mark; approximately +6 dB at top |
| Pan | Constant-power; centre approximately -3 dB to each side; hard left/right at the ends |
| Disk protection | Warning below approximately 5 GB free; protected 2 GiB reserve |